Preparing the terminals
Mounting, wiring and setting up the Hikvision and Intelbras terminals, their door sensor and the garage gate's relay so the panel finds them, what to do with old records and how to check each terminal.
The panel talks to each terminal over the network, with its address, user and password. This part is done on the terminal (on its screen or on its web page in a browser) before registering it on the panel.
Mounting
- Height: the camera between 1.40 m and 1.50 m from the floor for standing face reading, as the model's manual says. For wheelchair users and children, the terminal tilts its reading downwards up to a point; where that matters, a second, lower terminal or the card and PIN solve it.
- Light: avoid direct sun on the camera and strong light behind whoever passes (backlight). A lamp in front of the terminal helps a lot at night.
- Rain: an outdoor terminal only with an outdoor model or under a cover.
- Cables: network, 12 V, lock, exit button and, if there is one, the door sensor go in at the back; door 1's relay drives the lock.
Activating and setting the password
A new Hikvision terminal asks for an administrator password the first time (activation). Set a strong one, write it
down and hand it to the manager at the handover: the panel will use the admin user and that password to talk to the
terminal. Without it, the terminal has to be factory-reset.
The panel uses the terminal's standard interface (ISAPI, over HTTP on port 80, which comes on). Nothing of Hik-Connect needs enabling, and iVMS-4200 needs no installing.
Fixed address
Give the terminal a fixed address on the site's network (see The local network): in the terminal's network menu, a static IP outside the DHCP range, or a DHCP reservation on the router. Note the address.
Date and time
On the terminal, set the date, the time and the time zone (Brasília, UTC-3, no daylight saving). If the terminal
offers NTP, point it at an internet server (pool.ntp.org) or the site's. A terminal with the wrong time denies
visitors within their validity and records accesses at the wrong time.
The time also matters for the history: each entry gets the date the terminal thinks it is. A terminal that goes back to its factory date (01/01/2015, for one) records the accesses on that date, and they never show up in Acessos, which shows the recent days. The hub reads each terminal's clock every minute:
- More than 2 minutes off, the terminal's card in Dispositivos shows Relógio errado in red, with the date the terminal thinks it is and the hub's, and Acessos, Leitura dos terminais opens with the same warning.
- Right but set by hand, the card warns that it may go back to a wrong date if the terminal restarts (a power cut, for one).
- Either way, Acertar relógio, on the terminal's page, sets the time from the hub's and turns on NTP on the terminal, which from then on sets its clock over the internet by itself. It needs the permission to change devices.
Registering the terminal on the panel
Whoever has the devices permission on the panel (the administrator) goes to Dispositivos, Novo dispositivo, picks
Terminal de acesso ("Access terminal") and fills in: a name (say, "Portaria" or "Garagem"), the IP address, the port (80), the user (admin) and the password set
at activation. Testar conexão reads the model, the firmware and what the terminal supports (face, card,
fingerprint, PIN, QR code). With the terminal online, the panel starts sending it the people of its access groups.
On Dispositivos, each terminal and each recorder shows in a short card: whether it answers, what needs a look and its quick action (Abrir, "Open", on a terminal, Verificar agora on a recorder). Its name, or the arrow, leads to the device's page, where everything else is, in tabs: Visão geral (address, features, clock, the door's cameras), Resumo, Acessos (the reading of its entries, with Buscar eventos agora, and the latest ones), Capacidade, Configurações ("Settings": its registration in the panel, name, address, user and password, door), Aparelho ("Device": what lives on the terminal itself) and Histórico (the sends and the audit log of the device); on a recorder, Visão geral, Câmeras, Configurações (its registration), Aparelho (what the recorder says of its cameras) and Histórico. Each tab has a single Salvar ("Save"). Testar conexão and the Opções menu (Editar, which opens Configurações, Excluir, Importar usuários, Preencher dispositivo, Câmeras da porta) are at the top of the page. Each tab shows only to whoever may see what it holds, and the page's address includes the tab: a link opens right on it.
The Número da porta (fechadura) is the terminal's own door: 1 on a terminal of one door, like every face terminal installed so far. After the first connection test, the field says how many doors the terminal has, and the panel refuses to save a number it does not have. A terminal saved with the wrong door gets nobody: each send fails at once, saying the door is not on it, until the number is fixed.
Then, under Grupos, each access group (say, "Moradores") gets its doors. A person joins the group and, within seconds, is on every terminal of the group.
Intelbras terminals
Besides the Hikvision terminals, the panel talks to the Intelbras face terminals of the Bio-T line, such as the
SS 3532 MF. When registering, under Marca, choose Intelbras; the rest is the same: IP address, port 80, user
admin and the password created when the terminal was activated.
Beforehand, on the terminal's web page:
- Acesso, Código QR: QR Code desprotegido (unprotected QR code) turned on, with Ler QR Code, then Aplicar. It comes off: the terminal then only takes the encrypted QR codes of Intelbras' own system and refuses the QR codes of the panel's invitations and events as not authorized. Leave QR code alfanumérico off.
- Segurança, Serviços: the CGI integration turned on. It is how the panel talks to the terminal. It usually comes on.
- Date and time in the Brasília time zone, which it usually comes with. The panel sets the terminal's time, but writes local time.
A new terminal comes with its date at 01/01/2000. Once it is registered, use Acertar relógio on its page: the panel sets the time and turns on the time server. Until then, its entries get the wrong date and do not show in Acessos.
The SS 3532 MF reads faces, cards, QR codes and PINs. It has no fingerprint reader, and the panel does not read a card held to it: the card number is typed into the person's record.
In each person's first sync, the Atualizar usuário and Atualizar foto steps show as Recusa esperada (expected refusal): the terminal did not have the person yet, and the next steps add them. It is not a failure.
Support for Intelbras terminals is new. On the first one installed, check the terminal's Resumo to see that the people, photos and cards arrived, and Acessos to see that the entries show up at the right time.
Records already on the terminals
If the site already used the terminals with iVMS-4200 or registered people right on the screen, the panel imports those records: Dispositivos, the terminal's page, Opções, Importar usuários. It shows beforehand what it will create, what it will merge into someone who exists and what it will skip, with photos, cards and fingerprints. After the import, the panel becomes the place to register; what is registered only on the terminal's screen may be erased at the next sync.
Terminals set up apart often give the same person a number on each. When importing the second terminal, the panel sets apart under Podem ser pessoas que já existem whoever looks like someone already registered (the same card, a matching name) and asks who each one is. Anyone who is the same person is not registered again: their cards and fingerprints go to the existing record, and the terminal switches to its number. Repeated records already in the panel show up under Pessoas, Possíveis duplicados, to merge.
A card or fingerprint added right on a terminal for someone already in the panel stays on that terminal alone. To send them to the others, Importar usuários on that terminal with Importar cartões and Importar digitais checked: even with no one new, the panel says how many cards and fingerprints are missing, and the Trazer button brings them and sends them to each person's other terminals. Fingerprints only go to the terminals that read fingerprints.
Repeated records
Pessoas, Possíveis duplicados lists the pairs that look like the same person registered twice, the most likely first. Each pair says why it looks like the same person: the same card, document, photo or fingerprint, a matching name, the same phone or the same unit. On each pair:
- Mesclar shows both records side by side. Choose the one that stays. The cards, fingerprints, photo and missing details move to it, along with the groups, doors and access history. The other record leaves the terminals and is deleted. It cannot be undone.
- Não são a mesma pessoa dismisses the pair, which is not suggested again.
A pair the panel did not suggest, such as two names spelled very differently, is merged from the Pessoas list: the Mesclar com outro cadastro item, in the Opções menu on the person's row, searches for the other record.
Several terminals
Each terminal is registered once. To copy a terminal's list of people to a new one, Dispositivos, the new terminal's page, Opções, Preencher dispositivo: a wizard that chooses where to copy from and shows beforehand what it will send. Adding a door or replacing a terminal that broke, step by step: Replacing a terminal or the hub.
Checking a terminal
To see whether a terminal keeps up with the others, Dispositivos, the terminal's page, the Resumo tab. The panel reads the terminal right then and compares it with what the hub sends it: people, photos, cards, fingerprints and PINs, each marked Igual or Diferente. The terminal never gives PINs back, so for them only what the hub sends shows. Users blocked on the terminal are left out of the count. A terminal without a fingerprint reader, such as the DS-K1T343MWX, shows Não lê for Digitais and never gets fingerprints.
Below, person by person, what does not match:
- Falta no terminal: the hub sends it and the terminal does not have it. With the sending pending, wait a few seconds. With the sending up to date, the terminal lost the record: under Pessoas, Sincronizar in the Opções menu on the person's row sends it again.
- Credenciais diferentes: the terminal has another number of the person's photos, cards or fingerprints. Usually it is a card or fingerprint registered right on the terminal's screen. Importar usuários with Importar cartões and Importar digitais takes the cards and fingerprints to the other terminals.
- A mais no terminal: the terminal has it and the hub does not send it. "Sem cadastro na central" was programmed right on the terminal: Importar usuários brings the person in. "Excluído ou mesclado na central" is still leaving the terminal. "Sem acesso a esta porta" is a person in the panel whose groups do not include this door.
Ler de novo reads the terminal again. With the terminal offline, the summary shows only what the hub sends.
Testing a terminal
Before the handover, on the panel: register a test person with a face photo and a card, see the terminal show "synced" on their row, pass the door with the face and with the card, and check under Acessos that both passages show with their name. Then delete the test person: the deletion erases their data at once.
Terminal settings
On a terminal's page, Hikvision or Intelbras, the Aparelho ("Device") tab has the Ajustes do terminal ("Terminal settings") card, read from the terminal itself when the tab opens. Salvar alterações ("Save changes") writes only what changed and applies at once, without a restart; Descartar alterações ("Discard changes") goes back to what the terminal said. Each change goes to the audit log, with the value before and after, and the panel reads the terminal again after writing to check what it took.
The card shows only what that terminal has: a model without a face reader has no distance, and a setting the terminal did not report shows read-only, without keeping the others from being saved. On an Intelbras controller the opening time takes tenths of a second (for example, 2,5). Switching tabs with unsaved changes asks first.
- Tempo de abertura ("Opening time", seconds): how long the lock stays released after each access. It comes with 5. Less than 3 tends to be short for someone carrying bags.
- Liberar a mesma pessoa de novo após ("Let the same person in again after", seconds): after letting someone in, the terminal waits this long before letting the same person in again. It comes with 0, and then someone walking away still facing the terminal is recognized again and the lock opens again. Use 10.
- Distância de reconhecimento facial ("Face recognition distance"): how far the terminal recognizes a face. At an entrance where people pass close to the terminal on their way out, 1 m keeps it from recognizing someone just passing.
On an Intelbras controller the same settings are the door's Tempo de porta aberta and Intervalo de verificação (up to 180 seconds), and the face parameters' Distância de reconhecimento (1, 1.5 or 2 meters), the same as in its web interface.
Door sensor
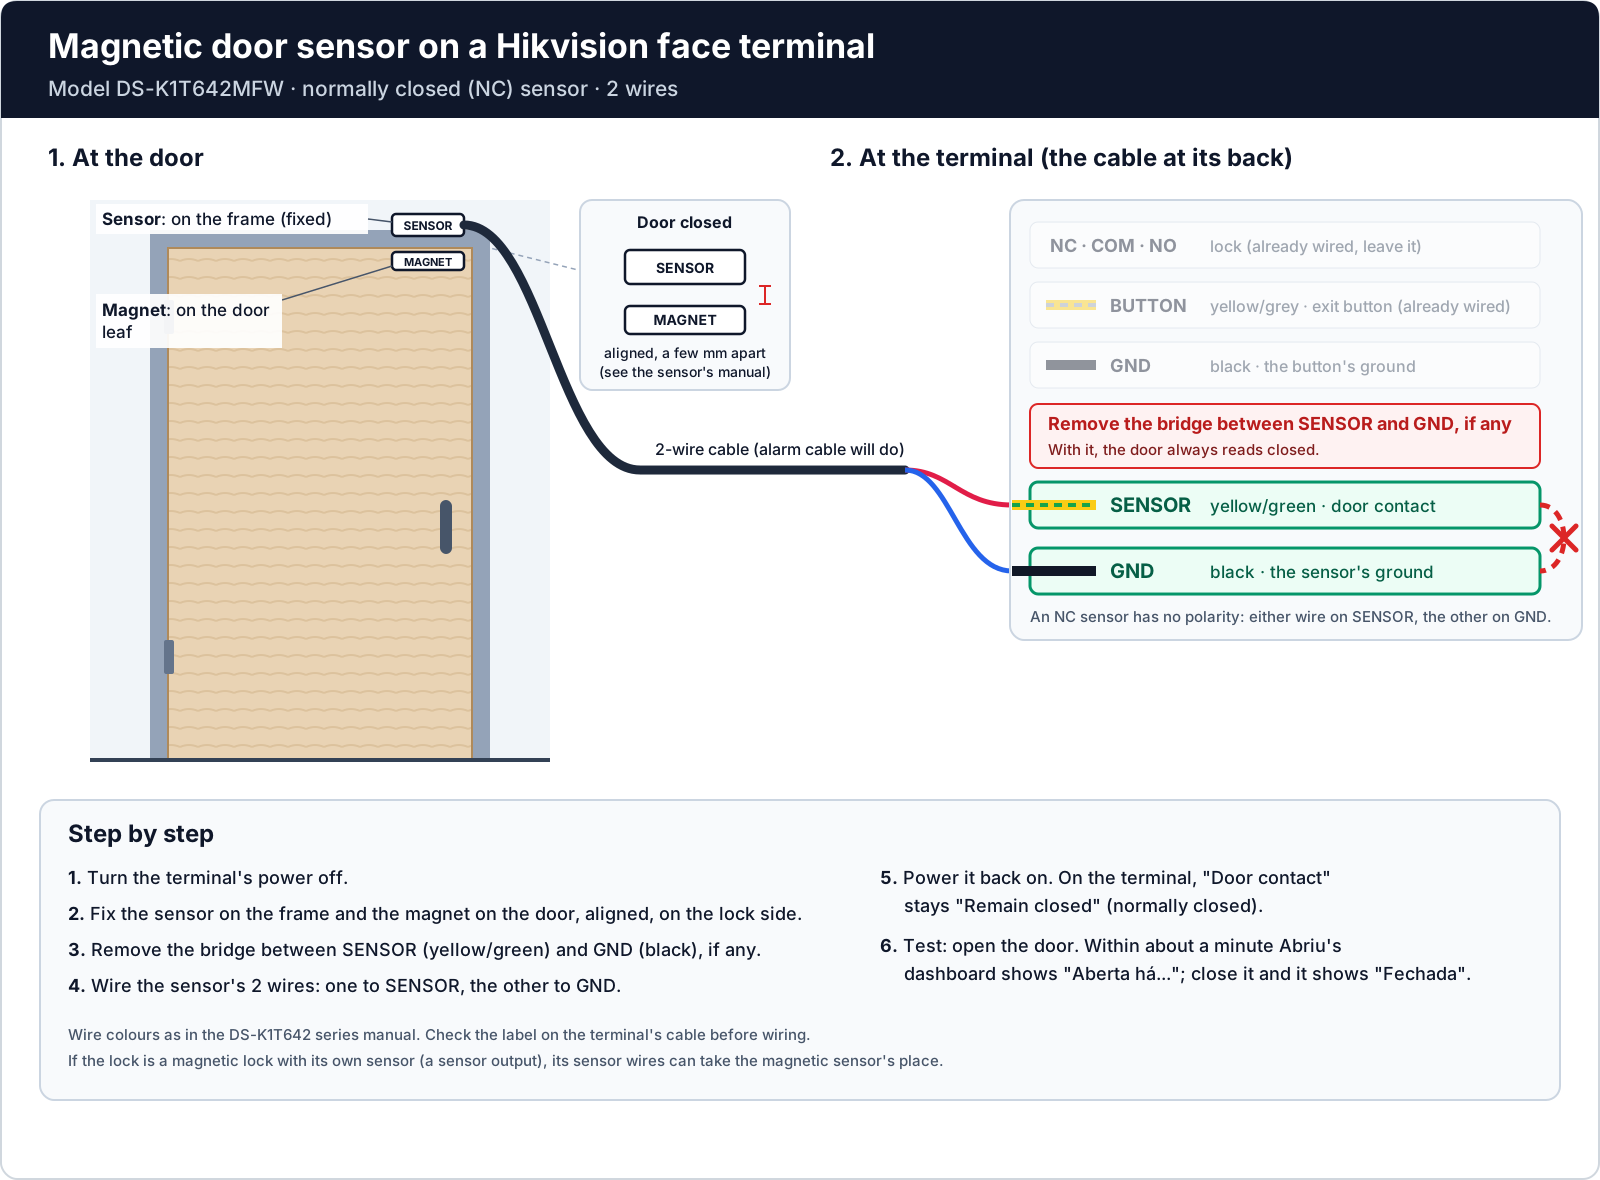
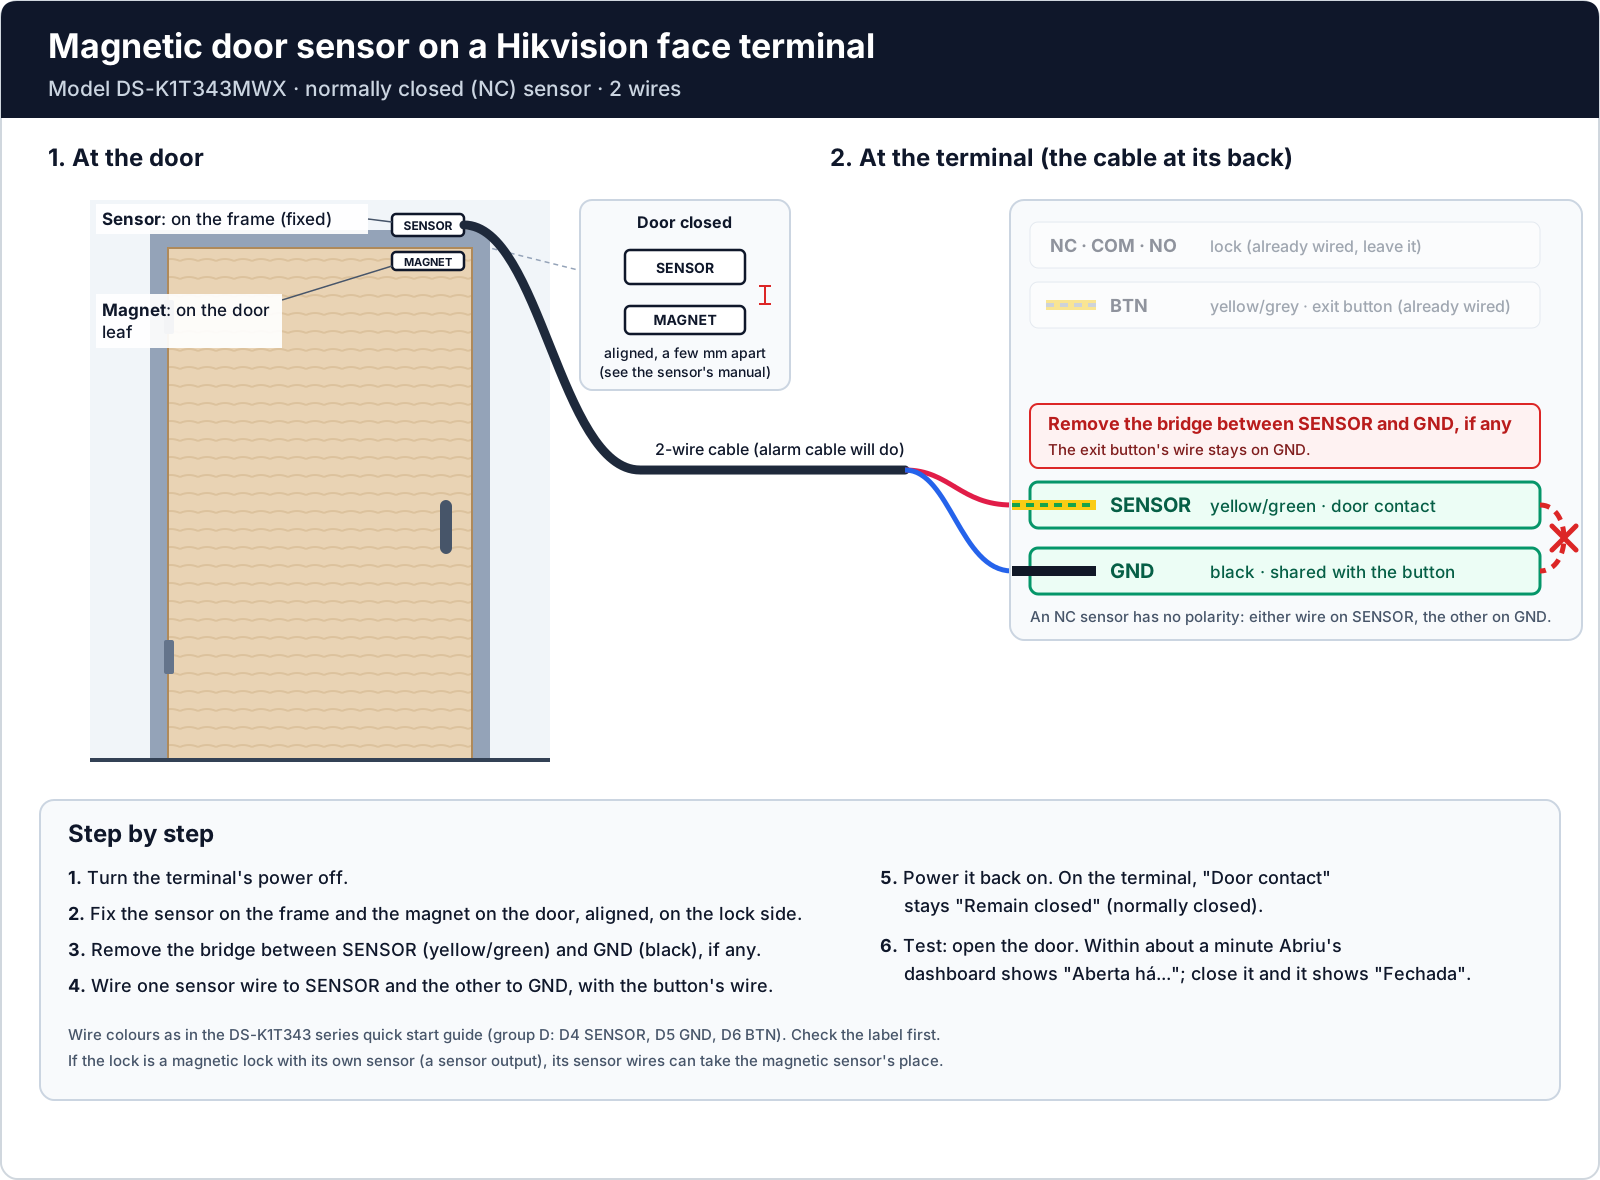
The Hikvision terminals, such as the DS-K1T642MFW and the DS-K1T343MWX, have an input for a magnetic door sensor. With the sensor wired, the terminal records when the door opens, when it closes, when it opens without anyone let in (forced, or opened with a key) and when it stays open past its own alarm time. The hub reads those records every minute, along with the entries, and the panel then:
- shows whether the door is Fechada ("Closed") or Aberta há 3 min ("Open for 3 min"), on the terminal's page, on its card in Dispositivos and on the Abrir ("Open") button;
- tells when the door is not closed within the time chosen on the panel, and again when it closes;
- tells within about a minute when the door opens without anyone let in.
Without a sensor, none of this shows and nothing is sent: the panel only shows the door's state once the terminal records its first door event. The garage gate opened by the relay has its own sensor, read by the relay (Gate state).
Materials
- One normally closed (NC) magnetic door sensor per door: its contact stays closed while the magnet is next to it, with the door closed. Surface or recessed, to suit the door and its frame.
- A two-wire cable from the door to the terminal (alarm cable does).
- The terminal's wiring diagram, on the label at its back or in the model's manual: terminal names change from one model to another.
Wiring
- Switch the terminal's supply off.
- Fix the sensor on the frame and the magnet on the door leaf, lined up and a few millimetres apart with the door closed (the sensor's manual gives the largest gap).
- On the terminal's wiring diagram, find the door sensor input. It usually shows as door contact, door magnetic or
sensor, next to a
GND. The exit button's input is close by: do not swap one for the other. - Remove the input's bridge, if there is one. It often comes with a jumper or a piece of wire to
GND: with the bridge, the door always reads closed and the terminal never records a door event. - Wire the sensor's two wires to that input and to
GND. - Switch the supply back on.
On the DS-K1T642MFW, the input is the SENSOR wire (yellow/green) and the ground is the GND (black) next to it; the exit button is on BUTTON (yellow/grey). On another model, follow the label on the terminal's cable.
On the DS-K1T343MWX, the sensor also goes on SENSOR (yellow/green), but there is a single GND (black), the exit button's too (BTN, yellow/grey): remove only the bridge, and the button's wire stays on GND, together with the sensor's.
On the terminal
On the terminal's web page, in the door's settings, the door contact stays as normally closed. The terminals installed so far already came that way: just check it. With the setting on normally open, or with a normally open sensor, the panel shows the door open while it is closed.
The terminal's own door-open alarm time can stay as it is: the panel's notice counts the minutes chosen on the panel.
On the panel
There is nothing to register: the terminal already registered starts showing the door's state as soon as it records its first door event. The terminal's page, its card in Dispositivos and the Abrir button show Fechada or Aberta há 3 min.
From then on, the terminal's Notificações ("Notifications") tab shows the Porta aberta ("Door left open") notice: if the client wants it, choose after how many minutes a door left open becomes a notification (blank: no notice). Whoever follows the devices gets "Portaria não fechou" ("did not close") after that time and "Portaria fechou" ("closed") when it closes, with the terminal's name. When the door opens without anyone let in, "Portaria abriu sem liberação" ("opened with no one let in") arrives at once, within about a minute. All of them come through the Porta ou portão aberto ("Door or gate left open") notice, in Minha conta (Notifications on phones and computers).
Just below, Avisar também quem passou por último ("Also notify the last one through") comes on: whoever went through the door, or opened it from the panel, up to 2 minutes before it opened also gets "Portaria ficou aberta" ("was left open") on their phone, if they have a panel account, and then "Portaria fechou". Whoever already follows the devices gets only the usual notice, once. Turn it off if the site prefers to tell only the front desk and the manager.
Testing the sensor
With the terminal online on the panel:
- Open the door and leave it open. Within about a minute, the terminal's page shows Aberta há… ("Open for…").
- Close the door: within the next minute, it shows Fechada ("Closed").
- If the client wanted the notice, choose its minutes under Configurações, leave the door open past that time and check "não fechou" arrives, and then "fechou".
- If the lock has a key, open it with the key, without going through the terminal: within about a minute "abriu sem liberação" arrives.
If nothing changes with the door open, the input is still bridged, the sensor is on another input or the magnet is too far. If the door shows open while it is closed, the sensor or the terminal's setting is normally open. If it shows closed while it is open, the sensor's circuit is closed all the time: the two wires' splices touch or the magnet is not lined up with the sensor (parallel, less than 1 cm away). To check, free one sensor wire from the input: within a minute the panel must show Aberta ("Open"), and then the splice or the magnet is the problem.
On Intelbras controllers
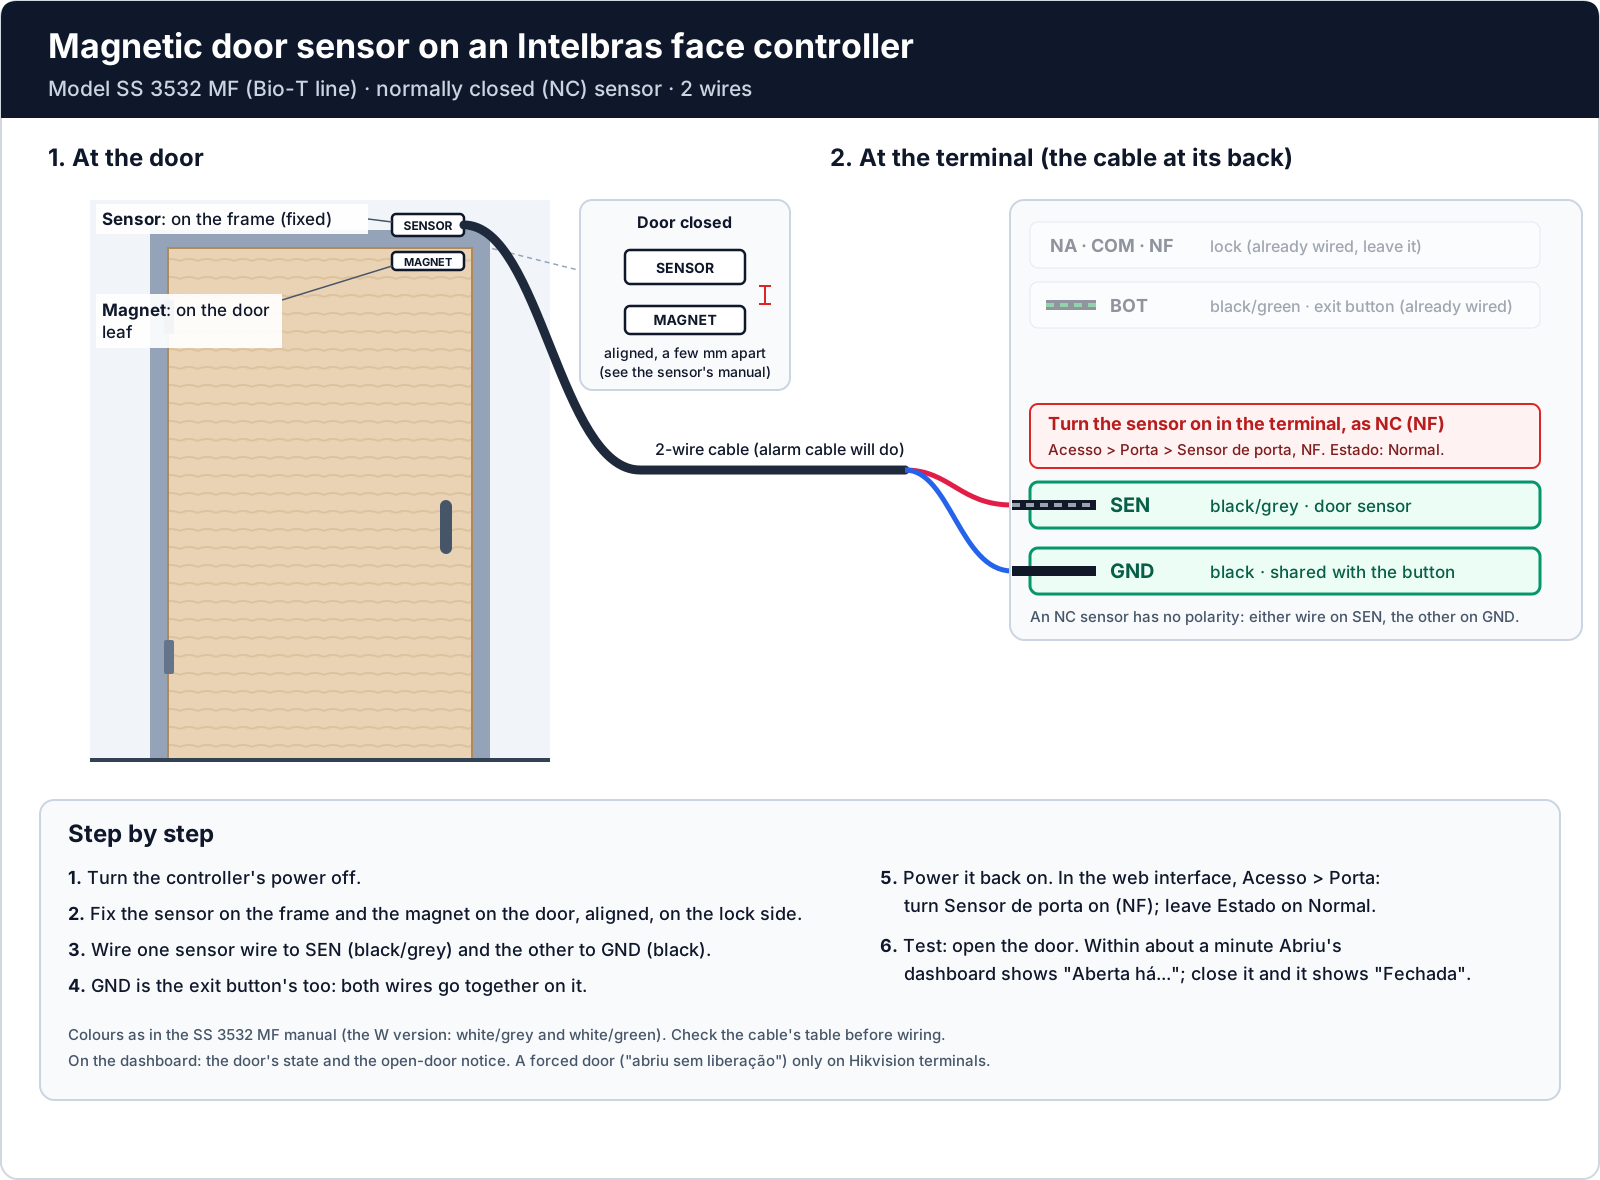
Intelbras' Bio-T face controllers, such as the SS 3532 MF, have a door sensor input too, and the wiring is the same: a normally closed sensor, one wire on SEN (black/grey; white/grey on the W version) and the other on GND (black). That GND is the exit button's too (BOT, black/green): both wires go together on it. In the controller's web interface, under Acesso > Porta (Access > Door), turn Sensor de porta (Door sensor) on, check Normalmente fechado (NF) (normally closed) is the one marked and click Aplicar (Apply). Leave Estado (State), just above, on Normal: there, Sempre Fechado (NF) and Sempre Aberto (NA) are the lock's (the door locked or released all the time), not the sensor's.
The panel reads the controller's sensor every minute: it shows Fechada ("Closed") or Aberta há 3 min ("Open for 3 min") and sends "não fechou" and "fechou" as for the Hikvision terminals, and the test is the same (Testing the sensor). A door opened without release is not told on Intelbras controllers: they only tell it as it happens, and the panel does not keep listening.
Unrecognized attempts
The terminal tells when it recognizes nobody several times in a short while: the face, fingerprint, card, PIN or QR code of someone not registered. A resident refused outside their schedule, or at a door not theirs, does not count: the terminal knows who they are. It comes on in every terminal, at 3 attempts in 5 minutes. To change it or turn it off, open the terminal in Dispositivos ("Devices"), its Notificações ("Notifications") tab, the Tentativas não reconhecidas ("Unrecognized attempts") card (1 to 20 attempts, within 1 to 60 minutes), and Salvar alterações ("Save changes").
The notice reaches the phones of whoever sees the accesses (Tentativas não reconhecidas in Minha conta) about a minute after the last attempt, when the panel reads the terminal's events: "Portaria: 4 tentativas não reconhecidas", "Entre 10:28 e 10:31: rosto 3, digital 1.". A long insistence sends a notice every 3 attempts (or the number chosen), not one per attempt. A tap opens the door's camera at the first attempt, with the live view on the same screen, for whoever may watch the recordings (door cameras); for the others, and without a camera on the door, it opens Acessos ("Accesses") with those attempts.
Garage gate (relay)
A Shelly relay (the Shelly 1 Mini Gen4, or another Shelly of the second generation or later) wired to the gate's board lets the panel open the gate. Abrir ("Open") gives a 1-second pulse (or the one in Duração do pulso, "Pulse length"), which the Shelly itself ends, and the board opens, stops or closes the gate on each press, like the gatehouse's button. With two more wires, the panel also shows whether the gate is closed and tells when it does not close (Gate state).
This part is the installer's walkthrough: it can be followed on a phone, in front of the board.
Materials
- A Shelly 1 Mini Gen4 (or another Shelly of the second generation or later).
- Flexible cable of 0.5 to 1.5 mm², in different colours for line, neutral and control, splice connectors (Wago type) and cable ties.
- The gate board's manual: terminal names change from one brand to another.
- A phone, to set the Shelly up, and the site's Wi-Fi password.
- For the gate's state, nothing more when the board has a signal-light output. Without one: an interface relay with a 12 or 24 V coil and the gate kit's reed (No signal-light output).
Before starting
- Switch the gate's breaker off. The board has 127/220 V exposed.
- Note the board's model (on a Peccinin it is printed on the board, such as CP4010F) and find in its manual the
push-button input and the auxiliary output (
AUX). - Check whether something is already wired to the auxiliary output: a courtesy light or a lock.
- Check with the phone that the site's Wi-Fi reaches the motor's box, where the Shelly will sit.
Wiring
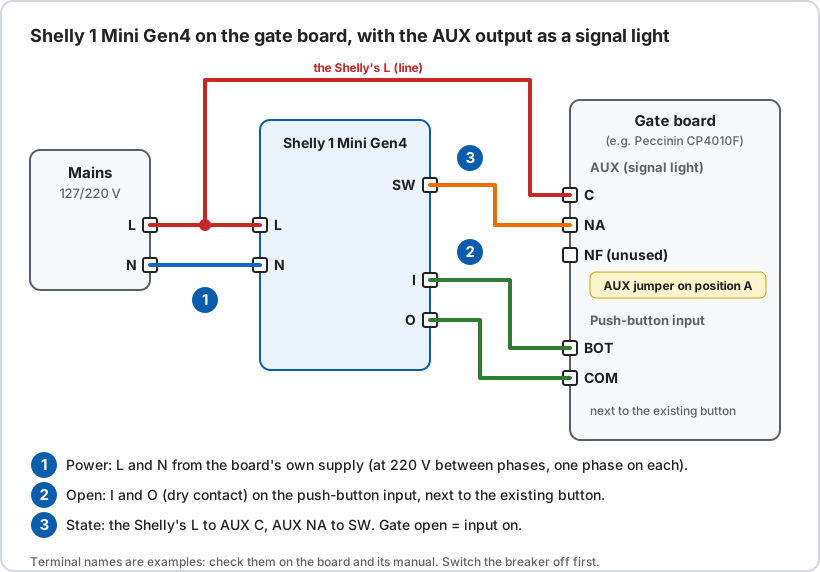
- Fix the Shelly inside the motor's box, away from the moving parts and not touching the board.
- Power (1 in the drawing): the Shelly's
LandNon the board's own supply. At 127 V, line onLand neutral onN; at 220 V between phases, one phase on each. - Open (2): the Shelly's
IandOterminals are a dry contact. Wire them to the board's push-button input (usuallyBOTandCOMorGND), next to the existing button. - State (3): the board's signal-light output, explained just below.
On the Mini, SW works at the mains voltage: only the board's contact (or an interface relay's) goes on it, never the
gate kit's reed sensor straight.
Gate state: the signal-light output
The board already knows whether the gate is closed, from its limit switches. Many have an auxiliary output that can work as a signal light ("sinaleira"): a relay that stays on while the gate is not closed. With it, the Shelly reads the state with no extra part, and everything stays inside the motor's box, with short wires.
On a Peccinin CP4010F, the AUX output is a dry contact ("somente um interruptor, não tem tensão", "only a switch, no
voltage", says the manual), and the Jumper Auxiliar picks what it does. The legend is on the board (1 in the photo):
no jumper, courtesy light; A, signal light; B, magnetic lock; C, programming.
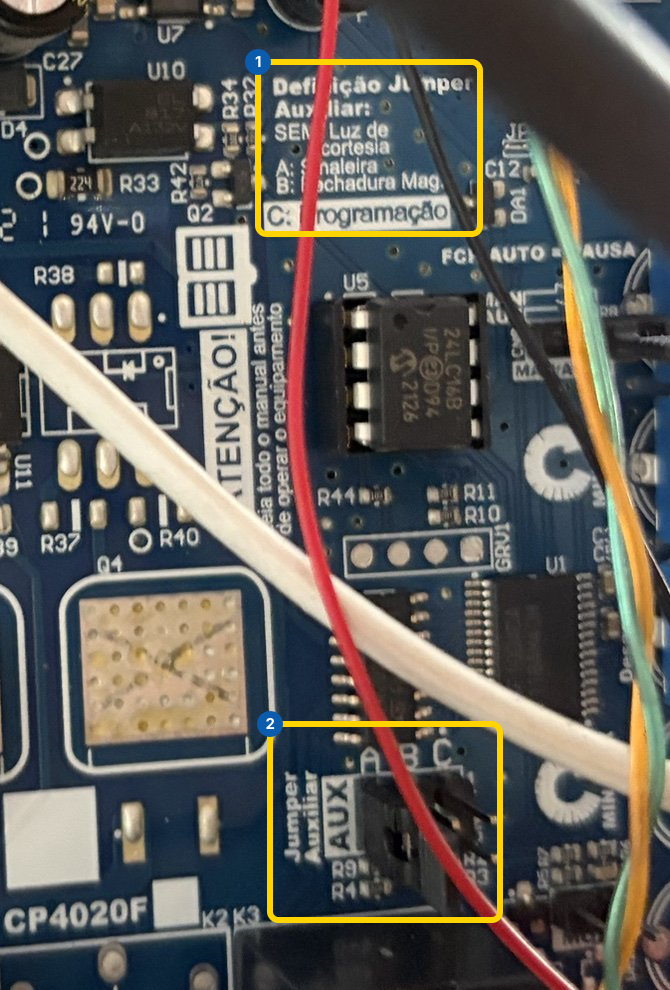
- With the board off, put the Jumper Auxiliar (2 in the photo) on position
A, signal light. - A wire from the Shelly's
Lto theAUXoutput'sC(common). - A wire from the
AUXoutput'sNA(normally open) to the Shelly'sSW. - If a courtesy light was on
AUX, it now stays on while the gate is open. If a magnetic lock was, leaveAUXto it and use the reed (No signal-light output).
On another board, look in its manual for a signal-light, traffic-light or gate-state output, with a dry contact, on while the gate is not closed.
No signal-light output: reed
When the board has no such output, use a reed sensor of the gate kit, always at low voltage: on the rail, with the magnet
on the gate, at the closed position. The reed drives a 12 or 24 V interface relay, fed by the board's accessory output
(the photocell's), and that relay's contact switches the Shelly's SW.
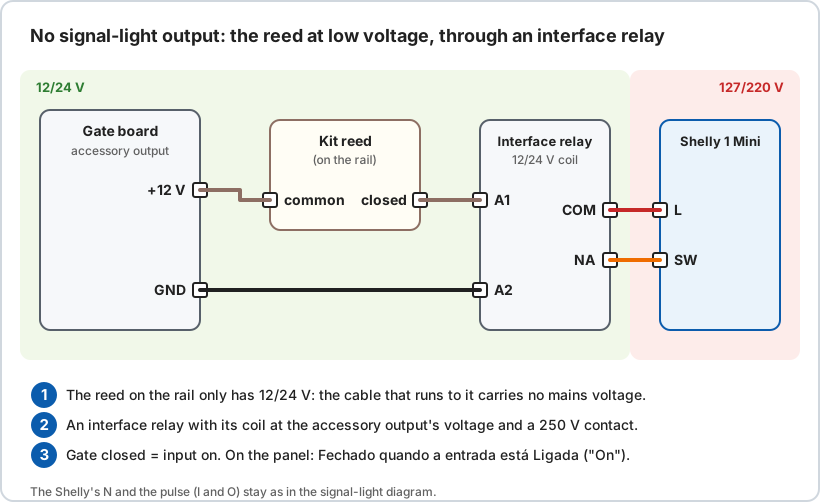
- Use the reed's common and "closed" wires.
- An interface relay with its coil at the accessory output's voltage (12 or 24 V) and a 250 V contact.
- The cable that runs to the rail carries 12 or 24 V only. The reed wired straight to the Mini's
SWwould take 127/220 V to the gate.
On the Shelly
On its web page (http://<the Shelly's ip>):
- put it on the site's Wi-Fi, with a fixed address (a reservation on the router), and keep it on Wi-Fi: in Zigbee mode the panel does not find it;
- set a password (the user is always
admin); - turn off Shelly Cloud;
- its access point: off, or on with a password. On, it is the way back into the Shelly when the Wi-Fi changes (join it
and open
http://192.168.33.1); - turn off Matter, which comes on and open to pairing (the Shelly restarts when it is turned off);
- on the output, an auto off after 1 second (at least the pulse length) and off at power-on: so it never stays closed after a power cut;
- the input as a Switch and in detached mode: so
SWnever switches the output; - update the firmware.
Once the relay is registered, most of this is also done from its Aparelho ("Device") tab on the panel, without the Shelly's page (On the panel); the Wi-Fi stays on its page, and the access point can also be turned on and off under Ajustes do Shelly ("Shelly settings").
On the panel
In Dispositivos ("Devices"), Novo dispositivo: type Relé (portão da garagem) ("Relay, garage gate"), brand
Shelly, its address (Procurar na rede, "Search the network", beside it lists the network's Shellys and fills in the
address and the port), port 80, user admin, its password and output 1. Leave Duração do pulso ("Pulse length") blank
(1 second) and raise it only if the board wants a longer press (0.5 to 10 seconds). Testar conexão ("Test
connection") shows its model and outputs, and the relay's page says under Configuração do relé ("Relay settings")
what of the list above is still missing; its card in Dispositivos says how many are missing.
On the relay's Aparelho ("Device") tab, Shelly does on the Shelly itself, asking first: Corrigir ajustes ("Fix settings": Shelly Cloud, Matter, the input and the output; also under Configuração do relé), Definir senha or Trocar senha ("Set password", "Change password": the panel makes a strong password and shows it only once, so keep it if you will sign in to the Shelly's page), Endereço fixo ("Fixed address", when the router cannot reserve one, see Fixed address), Atualizar firmware ("Update firmware") and Reiniciar Shelly ("Restart Shelly").
After it, Ajustes do Shelly ("Shelly settings") shows the Shelly's own settings, one by one, as it holds them now: Shelly Cloud, Matter (on the models that have it), the access point, Modo da entrada (SW) ("Input mode"), Saída ao voltar a energia ("Output when the power comes back") and Desligamento automático ("Auto off"). Salvar alterações ("Save changes") writes only what changed, and changing Matter restarts the Shelly. For the gate, the shortest way is still Corrigir ajustes, which applies at once what this guide asks for.
Under Sensor de porta fechada ("Door-closed sensor"), on the Configurações ("Settings") tab (or when registering it): Entrada 1 ("Input 1"); Fechado quando a entrada está ("Closed when the input is") Desligada ("Off") for the signal light (Ligada, "On", for the reed). Once saved, if the client wants it, Avisar se não fechar em ("Notify if not closed within") a few minutes, on the Notificações ("Notifications") tab. The relay's page and the Abrir button show Fechado ("Closed") or Aberto há 3 min ("Open for 3 min"), updated within a few seconds, and whoever follows the devices gets "Portão da garagem não fechou" ("did not close", with the relay's name) when it does not close in time, and "Portão da garagem fechou" ("closed") when it closes, through the Porta ou portão aberto ("Door or gate left open") notice.
On the camera that shows the gate, tick the gate in Câmeras da porta ("Door cameras"): the Abrir button shows next to its picture.
Who opens it
The Abrir portas ("Open doors") permission comes with a choice of doors, under Portas que pode abrir ("Doors they can open"): Todas as portas ("All doors") or Somente as escolhidas ("Only the chosen ones"). In the residents' profile, for example, leave only the garage gate, and every door to the gatehouse. Someone with more than one profile opens the doors of all of them together. A new door is only allowed to a profile with Somente as escolhidas once it is ticked there.
Tests with the gate
With someone at the gate:
- Switch the breaker back on. In Dispositivos, Testar conexão on the relay: it shows online.
- Open with the remote. On the Shelly's page (
http://<the Shelly's ip>), Input (0) stays ON while the gate is open, without blinking; within a few seconds, the relay's page on the panel shows Não fechado há… ("Not closed for…"). - Wait for the gate to close: Input (0) goes back to OFF and the panel shows Fechado desde… ("Closed since…").
- Open from the panel, with Abrir: the gate opens as with the remote.
- If the client wanted the notice, leave the gate open past the time chosen and check "não fechou" ("did not close") arrives, and then "fechou" ("closed").
If Input (0) blinks while the gate is open, that board's signal light blinks: use the reed. The panel does not close the gate: the board's automatic closing does.
Camera recorder
If the site has a Hikvision camera recorder (a DVR or an NVR), it can be registered on the panel too: Dispositivos, Novo dispositivo, with the type Gravador de câmeras (DVR/NVR) ("Camera recorder (DVR/NVR)" in English), the IP address, the port (80), and the recorder's user and password. Give it a fixed address, as the terminals have, and set its date and time.
The recorder opens no door and joins no access group: the system only watches it. It checks every so often the disk, whether the cameras have video, whether there is a recent recording and whether the recorder's clock is right. A problem that lasts half an hour is e-mailed to Abriu's team, and to the site's contacts who chose to get the alerts (the team marks them on the site's card), with another e-mail when it is back to normal. The check reads only those states, and no image is ever stored.
On the recorder's page, Visão geral shows its disks and its clock, and whoever manages the devices sets the clock there: Acertar relógio ("Set clock"). The time comes from the central, and from then on the recorder keeps it over the internet (NTP). The clock matters because the recorder stamps and searches its recordings by its own time.
The Câmeras tab lists each camera with its signal, its last recording and the doors it films, with Ao vivo and the way to it on Câmeras (for whoever may watch it). The pencil next to each camera changes its name (up to 32 characters). The name is saved on the recorder itself: it changes on the panel, in the recorder's apps and in the text it writes on the picture, in the recordings from then on. An IP camera has its name in the camera itself and is not renamed here.
The Aparelho ("Device") tab reads from the recorder, right then, how it is set up: where its clock comes from and, for each camera, how it records (continuously or on motion), the recorded and the live picture (format, size, frames per second and rate), motion detection and the text on the picture. Whoever manages the devices changes, with each camera's edit button, what the recorder lets the panel change: motion detection (on or off, and its sensitivity) and the text on the picture (the camera's name and the date). Recording on motion depends on detection: off, the camera stops recording when something moves. Recording and picture quality can't be changed from the panel yet. An IP camera is set up in the camera itself.
Whoever has the permission Ver câmeras ao vivo ("Watch cameras live"; the administrators have it) watches the cameras live in the panel, under Câmeras, in a mosaic like the recorders' own apps: 1, 4, 8 (one large and seven small), 9 or 16 cameras per screen, with arrows to the other screens. The cameras start stopped, to spare the site's internet: each square shows its camera blurred, in a picture too small to recognize anyone, and a tap plays it. Ver todas ("Watch all") plays every camera of the screen, and of the next ones, until Parar todas ("Stop all"); the chosen camera has Ver ao vivo ("Watch live") or Parar ("Stop"), and the ones played one by one stop when the screen changes. A tap on a playing camera chooses it, another opens it alone: there, the fingers or the mouse wheel zoom the picture in (up to 4×), and a sideways drag goes to the next camera. A camera dragged onto another swaps places with it (on a phone, hold before dragging), and Organizar ("Arrange") does the same with taps; the panel keeps the number per screen and the order in that browser. The page's address follows what is on screen (the recorder chosen, the number per screen, the screen, the order, the camera open on its own and the recording's moment): a reload keeps the view, and the link shows the same to someone else, who sees only the cameras they may watch. With a camera open on its own, the browser's Back returns to the mosaic. On a phone, the full screen button in the corner of the picture puts the cameras on the whole screen, turned sideways; on an iPhone, it shows with a camera open on its own and opens it in the iPhone's own video player. On a phone turned sideways, the mosaic fills the screen; held upright, the cameras are in two columns as tall as the screen, 1, 4, 6 or 8 to a screen. The cameras pause together after five minutes, until Continuar ("Continue"), and every opening is in the audit log, one line per recorder with that screen's cameras. The picture goes through the site's central, which must reach the recorder's RTSP port (554) on the local network, and uses each camera's substream, which must be H.264 (the default of Hikvision recorders). Each camera on the screen uses the site's internet while someone watches from outside: with 16 per screen, prefer a connection with a good upload speed. That permission does not open the Dispositivos page: whoever only watches the cameras, such as a residents' profile, gets Câmeras and never the devices' address, login or serial number. Give the residents only the cameras they should see (the entrances, for instance): in the profile's list, in Perfis.
Whoever has the permission Ver gravações das câmeras ("Watch camera recordings"; the administrators have it, other profiles get it in Perfis) sees what each camera recorded. With the live cameras too, a camera opened alone (or by the chosen camera's Gravações button) has the day's timeline under it, with what was recorded: the whole day, 1 hora ("1 hour") or 5 min, and arrows to the other days. A tap or a drag on it puts the recording of that moment where the live picture was, with -30 s and +30 s, and Ao vivo ("Live") goes back; a moment of now stays live. Whoever may only watch the recordings has, under Câmeras, each camera's Gravações button: they pick the day and the time, or tap the day's bar, which shows what was recorded. The recording goes through the central like the live picture, ten minutes at a time, and every playback is in the audit log. The recorder records only on motion, and the playback skips the pauses. It takes only a few playbacks at once (four on a Hikvision recorder): with all of them in use, the panel asks to try again in a few minutes. On Hikvision recorders the recordings are H.265: Safari and an up-to-date Chrome or Edge play them, Firefox mostly does not, and the panel says so when the browser cannot.
Door cameras. On each terminal's page (and the gate relay's) in Dispositivos ("Devices"), the Opções menu has Câmeras da porta ("Door cameras", for whoever manages the devices), also on its Visão geral: check the recorder's cameras that show that door, up to 8, and the page lists them. Without any recorder registered, the option says the cameras come from one and leads to Dispositivos to add it. The same can be done from the camera itself, under Câmeras: opened alone, it has Escolher portas ("Choose doors"; or Portas, "Doors", over its entries once it shows some), where the doors it shows are checked. A camera opened alone then shows that door's entries on its timeline, a dot with each person's initials (orange when the entry was refused; with the mouse over it, a tooltip gives the name, how they came in and the time), and the Entradas ("Entries") list under it; a tap on an entry shows the recording from 5 seconds before it. In Acessos ("Access"), whoever may watch the recordings has a Câmera column, with Ver na câmera ("Watch on camera") on each entry at a door with cameras: it opens the first camera checked, in the recording of that moment. The entries show for whoever may see the access history (only their linked people's, for whoever has only that), and a camera off the person's list is not offered.
Opening the door from the camera. Whoever may open doors has Abrir ("Open") on a camera that shows a door: on the camera chosen in the mosaic, on the camera opened alone (live, not in a recording) and in Ao vivo ("Live") under Dispositivos. That way they see who is at the door and open it without leaving the screen. A camera that shows several doors has a button named after each one; a door that is not responding is greyed out, and one whose terminal does not open from the panel is left out. The panel asks for confirmation, as in Dispositivos, and the opening is recorded in the audit log.
The permission to open doors gives no Dispositivos page nor the terminals' alerts: a resident with it opens from the camera and from Abrir on the home page, without seeing the list of devices. Whoever should see the devices (the front desk) also needs Dispositivos (ler) ("Devices, read") in their profile.
Photo and clip. With the permission Salvar e compartilhar imagens das câmeras ("Save and share camera images"), the chosen camera has Foto ("Photo") and Clipe ("Clip"): the photo is the picture of that moment, live or from a recording, and the clip records the next 10, 20 or 30 seconds in the browser itself (in a browser that records no video, only the photo shows). Then Salvar ("Save") downloads the file and Compartilhar ("Share") opens the phone's share sheet (WhatsApp, e-mail). Every photo or clip saved or shared is in the audit log, with who, the camera and the time. The administrators have this permission; give it to other profiles in Perfis ("Profiles") only if they may take images out of the panel.
With either permission, the Câmeras ("Cameras") menu shows up once the site has a recorder registered and at least one camera is allowed to the person. It shows every allowed camera of each recorder, those without a picture too; with more than one recorder, all of them together or one. Whoever may only see the recordings gets the list of cameras, each with Gravações.
Both permissions come with a choice of cameras, under Câmeras que pode ver ("Cameras they can watch"): Todas as câmeras ("All cameras") or Somente as escolhidas ("Only the chosen ones"). In the residents' profile, for example, choose every camera but the party room, and leave every camera to the administrators. Someone with more than one profile sees the cameras of all of them together. A new camera on the recorder only shows to a profile with Somente as escolhidas once it is ticked there.